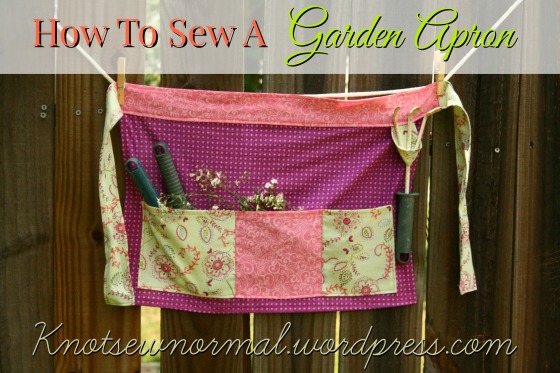
 As you all know we are doing a LOT of gardening. (and it is going really well) I am always struggling with a place to keep my tools when I am working. I hate to lay them on the ground and forget where I put them, I am usually wearing shorts that don’t have pockets (plus I am just not to keen on the idea of putting gardening tools in my pockets.) That is where I came up with the idea of the Garden Apron. I wanted something super easy to sew with a few pockets. I made this of quilters cotton. I wanted something that I could just toss in the washing machine when I am done in the garden.
 1. This apron does not take a lot of fabric. All this was just some leftovers I had in my scrap box. Here
Here is your cut list:
- (1) 21″x13 1/2″ – Apron Body
- (1) 22″ x 5″ – Front Part of Tie
- (2) 20″ x 5″ – Sides of Tie (I actually cut mine at 15″x 5″ and it is almost too short)
- either (1) 18″ x 7″ or several different fabrics to equal 18″ x 7″ (mine were 6″x7″, 6.5″x7″ and 6.5″x7″)
2. Sew your 2 side-tie pieces to the front-tie piece, right sides together, using a 1/4″ seam allowance.
3. Press open seams on tie pieces, then press top and bottom up 1/2″ and press edges in 1/2″
4. Press tie piece in half lengthwise and set aside for now.
 1. If making a patch-type pocket, sew pieces with right sides together, using a 1/4 seam allowance. Zig-zag stitch or serge seams and press to the outside.
2. On pocket piece, fold bottom and side edges in 1/4″ and then press, fold top side edge down 1/4″ and press, then fold 1/4″ and press again. Topstitch along top edge.
3. On your apron piece fold side and bottom edges in 1/4″ and press, fold each side again 1/4″ and press. Topstitch along sides and bottom edge.
4. Position pocket on apron piece and pin. Topstitch pocket to apron around sides and bottom.
 1. To make separate pockets, you are going to “stitch in the ditch” or sew right in the seam where you joined the pocket pieces together. Make sure to back-stitch several times at the top of pocket to give it extra strength.
2. Take your loop pieces and place them right sides together, stitch on each long side using a 1/4″ seam allowance. Trim seam allowance down to 1/8″, turn and press loop.
3. Place loop ends together and baste at the top of your apron piece.
4. Sandwich your apron piece in the middle of the front tie and pin in place. Topstitch around all four sides of the tie.
TADA! You are done. Now throw that apron on and get out and dig in the dirt.


Like this a lot! Nice tutorial 🙂
LikeLike
Thanks Irene! That means a lot!
LikeLike
Pingback: Tutorial: Gardening apron | Sewing | CraftGossip.com
Pingback: July 4th Felt Wreath! Garden Apron! Sewing Machine Cover! Crocheted Valance! Patriotic Candle Cans! Free Embroidery! Plus Recipes, Jokes, Art & Memories | Mark Lipinski's Blog